How I Setup Backup Policies In My Avamars, In The Simplest Way Possible.

When I first setup my first Avamar installation, the first question I had was, “How do other professional companies setup theirs? I could not get a lot information about this. I didn’t know if it was the best way to set it up to do backups and Dell was not forthcoming with the information themselves. So after sometime of doing this and few sprinkling of some Dell best practices, I have got what I believe is the best way of setting an Avamar up and here’s how.
We have here, in the graphic below, an Avamar console with a brand new Data Domain 6400 attached. Now to the right side of the below image we do have a Data Domain Virtual Edition or DDVE that is not pictured. Otherwise the DD6400 would be to the right of the Avamar under the “Capacity” area. I say this in case those who are familiar with this layout wonder why they are stacked on top of each other, and that is the reason why. I digress.

First I want to bring up that the Navigation tab at the top menu (white background with black letters) has all of the same exact things as the select-able options at the very top (blue background with white letters). The take you to the same places.

In order to start backing up servers, we need to setup a “Policy” for how we want to backup servers. Now there are many things that are needed to tweak and customize in the Avamar console to set the best policy, and we will handle them one at a time. So let’s click on “Policy” and we’ll get started.
Now in the below example I have covered up some of my existing policies so that you can see what it should look like when an Avamar is new, and we have already connected to a VMware vCenter.

Note: Avamar has a domain that exists from the name of your Avamar, in our example Avamar.domain.local. This is an Avamar internal domain only. From the root, or top level, of the domain sits Avamar.domain.local (or whatever your Avamar name is) and below it is other domains (in Microsoft’s Active Directory what we thing of as an OU or Organizational Unit). I want to clarify this so not to confuse anyone while we navigate the Avamar.
At the top domain of “Avamar.domain.local” we will right click and it will bring down a box for “New” and select “Backup Group…”

We will give it a name such as Virtual_Machines or whatever name makes the most sense to what you are backing up. We can then click “Next”.

Here we can see that we are at the “Dataset” part of the backup policy.
Note: Dataset is where we set the type of plugins that are used to backup the servers. The plugin can be a filesystem, or virtual disks, or many others, which will allow the backup job to backup and then restore that particular type of data. If, for example, we backed up virtual disks only and not a filesystem, then we would have to restore an entire VM in order to recover a file. Same can be said if we did a filesystem only, we would not be able to restore a VM, because we never backed up that “type” of data.
Note: Also, I validated this with Dell, that when we backup a filesystem and a VM image, we are essentially making two backups of the same thing. As a “filesystem” doesn’t know about the VM disks and the VM disk doesn’t know about the filesystem, they both will not de-duplicate as they are considered unique data. Therefore they will take up, potentially, double the space, even though they are backing up the same data, but in two different forms.

Because we are wanting to specifically backup certain types of data that pertains to our environment, we can clean up the plugins by creating a custom data set. Let’s click “Finish” which will create our incomplete backup policy, but will allow us to go back to it, once we have created our custom dataset.
We can now see that our policy has been created.

Let’s go to the top menu and select “Tools” and then “Manage Datasets…”

Once the window opens, the root of Avamar should already be highlighted at the top and we can click on New. A window will open named New Dataset.

We can name our dataset something that is related to the type of backup we want to perform. In this case we will name it Virtual_Machines. We can then select “Enter Explicitly” and that will make the + and – buttons clickable. This allows us to add or remove plugins from the list at the bottom.

As we mentioned in the previous notes, we will remove any plugins that we believe we will not need to backup and likewise, restore. This will eliminate extra growth that we never needed. In most cases the plugins will not be used if that type of data is not present, but removing them up front, will guarantee our storage usage is only used for what we need.
We can select individual plugins from the list and subtract until we are left with what we want to backup or we can select the one at the top and scroll down until, right before one we want to keep. We can hold down the shift button on our keyboard and click the plugin, selecting a list of plugins to remove and hen click the – button.

We are going to also remove everything below the “All local Windows filesystems” as I want to demonstrate how to add plugins back to the list. Let’s use the drop down on the “Select Plug-In Type:”

In my environment, we use VMware for our VMs, so we also want to add the plugin for “Windows VMware Image”, “Linux Filesystem” and “Linux VMware Image” by selecting each one and clicking the + button to add it.
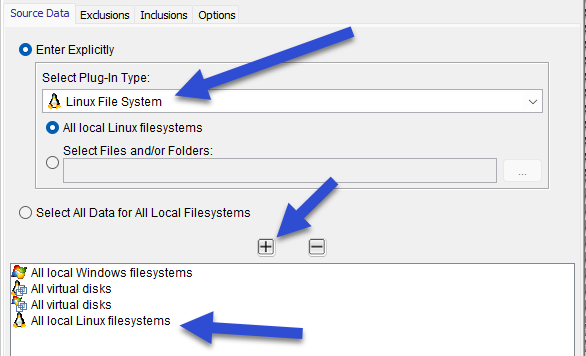
Notice that when we add the “Linux VMware Image” and add it to the plugin list, the name changes to “All virtual disks” with the Linux penguin icon next to it. I do not know why this changes, but I wanted to draw attention to this to cut down on any future confusion.
A Few Notes About Datasets And Their Granularity
Note: If we were backing up a Windows OS, physical server, then we would need to create a dataset that would backup the “Windows VSS” and the “All local Windows filesystem” to recover the filesystem of the physical server, but also the OS image of the physical server to restore a “Bare Metal Recover”, if this is our plan to recover physical servers.

Note: We can also select only specific VM hard disks to backup, if we wanted to get granular. Once we have made our first backup of a VM, with a filesystem plugin, we can go back into a dataset and select items, such as folders, to backup to get even more granular. Avamar has to backup the whole filesystem, before it can navigate through the folders.

Back To the Current Dataset
As this dataset is for VM backups we will not concern ourselves about physical server backups or specific files and folder. With our two plugins selected we will click OK and see at the bottom of the list we have created our new Dataset. We can now close this window.

Now let’s go back into the “Policy” through the navigation menu and once there either double click the “Virtual_Machines” backup policy we created earlier or we can select it and click “Edit”, either one will open the policy. It may take a few seconds to open.

Once open click the “Dataset” tab and this will bring us to where we left off when creating our policy. In the “Select an Existing Dataset:” drop down menu, we will look for the Dataset we just created named “Virtual_Machines”.


When we closed the policy creation wizard, we had created the policy, and everything we would of “Next” through in the wizard, was left at Avamar default values. As we did above, we then change the default value of the dataset to our newly created dataset. We will now go into each tab at the top and add the necessary parts that we don’t want left at default values.
Schedule tab we usually leave at default values. We could get out of the policy and select “Tools” and “Manage Schedules…”, but the default is around 10pm every night and that is fine with us. So we will leave it at “Default Schedule”.


On “Retention Policy” tab we will need to create a custom retention, so lets click OK at the bottom and we will go into “Tools” and select “Manage Retention Policies…” and once opened click “New” at the top of the window to create our new retention policy.

Notes About Retention Policy
Note: After talking to Dell, I was told that for a Data Domain (which is the preferred backup storage for Avamar) needs to keep at least 14 daily backups to be most effective at de-duplication. What 14 dailies means is if we took a backup today, we will keep 14 total backups of the up coming days. If no other additions are made then on day 15 the backup we took today will expire (delete itself) automatically. This will continue for everyday moving forward. Every new backup, the 15th day is expired.
We will name this “Retention Policy” 14-4-3. This may seem like an odd name, but let me explain. We will create this policy to backup and keep 14 dailies, 4 weeklies, and 3 monthlies, so our name is 14-4-3. We can name it whatever make the most sense, but at a glance we know what the policy is.
Note: Now that I explained 14 dailies, let me explain the others. Let’s say that our 15th day keeps expiring and when that 15th day falls on a Sunday, it keeps it so that we now have 1 weekly. On Monday the new 15th day will expire and this will continue as before until the next Sunday when it keeps the Sunday backup. It will continue to do this until we have 4 Sundays of backups, or 4 weeklies. When the 5th Sunday comes around, the first weekly backup will expire. On the 1st of the month, we will keep one backup and this will repeat until we have 3 monthlies of backups. Just like before on the 4 backup of the 1st of the month the first monthly backup we took will expire. We will then have 14 days, 4 weekly, and 3 monthly backups. It will look like this.


We can see on the yellow calendar dates, we have the first day of the month for April, May, and June, so 3 monthlies. We have 4 weekly Sundays on June the 8th, 15th, 22nd, and the 29th. Then we have the past full two weeks, so that is 14 dailies.
Finishing The Retention Policy
That concept of 14-4-3 is the hardest thing for most people to figure out on their own. I hope this visual helped. So from here we will edit our retention by checking the “Override basic retention policy for scheduled backups” and then clicking “Advanced…”

Here we enter in the following and click “OK”

You will get this warning and we will click “Yes”

Then click “OK” and then “Yes” that we are sure we want these settings.

Let’s go back into our backup policy and go back to the “Retention Policy” tab. In the drop down we will select our newly created retention policy.


Now let’s go to the “Members” tab.
Note: If you have not done so already, you need to add your vCenter to the Avamar in the “Navigation” menu and select “Administration”. Make sure to have the “Account Management” tab open.
When we select our vCenter we will get a list of servers in vCenter that are available to add to our backup policy.

We can click on a server we want to add to our backup policy. We can also hold down the shift button and click on a lower server to add a group of server. Once selected we click the “Include” button and the “Membership” column will change from “Not selected” to “Included (by user)”.


With our servers added let’s go to the “Proxies” tab and we can either select each proxy individually or what I like to do is check the box for “Auto proxy mapping.

Note: If you do not have a proxy created already, you will need to click “OK” on the backup policy again to get out, and create a proxy in Avamar. You can do this at the top menu of Avamar by clicking “VMware” and then “Proxy Deployment Manager”. You will configure the proxy to your network environment and then apply your settings, which will create the proxy in vCenter. I have a tutorial on it here.

When we click “OK” in our policy, we can now see our newly completed backup policy completed. We can either let it run at its scheduled time, or, making sure the policy is highlighted, click on “Run” and our policy will begin backing up our servers.

We can go to “Navigation” and then “Activity” to watch the backup progress.